Showing posts with label yankee cooking. Show all posts

Tuesday, June 7, 2016

Lest We Forget.....

.....the deliciousness of tapioca. I remember as a child, tapioca pudding could be enjoyed at most restaurants, school cafeteria's and at home. We never blinked an eye when we were served this "soft-lumped" sweet, vanilla-tinged pudding. But that was the extent of the flavor...vanilla!


I don't even remember anything but a firm glob of whipped cream sitting on top, only to be folded in before we lifted a spoonful into our mouths.

I do believe, however, that it is a sign of the times that we rarely see this pudding served anywhere and anymore. Not because our palates have changed, per se, but because parents do not cook at home nearly as much as they did many years ago. Don't you agree?

It was a treat to have home baked cookies, pies, cakes and puddings because not only did our parents take the time to cook for us, but the array of sweet treats found at any store was miniscule compared to today's inventory.

With the vast array of candies, pastries and sweets found on counters, next to the cash registers, now, our taste transcends just simple and sweet. We have choices of flavors that we didn't have a generation ago, but those flavors are manufactured.

And because of our "fake food" indulgences of today. our bodies are slowly begging for change. Accepting the man-made treats with ingredients that are manufactured in a lab, is universally accepted by our bodies, forgoing anything natural and homemade.

Let's take a few minutes and prepare this classic dessert, but with something that compliments this dish, and ingredients our body desires.....fruit and flavor!


Beautiful Lemon-Coconut Pudding 


Such a gorgeous presentation, only "one-upped" by the flavor of lemon, coconut and strawberries, all mingling on your tongue as brightly as the visual impact of this Brazilian-inspired dessert. The coconut water is widely available in most supermarkets and if desired, add a couple drops yellow food coloring to the pudding before refrigerating.


Nonstick cooking spray
3 cups coconut, plus more for dusting
3 cups small pearl tapioca *
1/3 cup sugar
2 cups fat free or low fat sweetened condensed milk
1 1/4 cups coconut water, divided
Grated rind from 1 lemon
Juice from one lemon
1 cup lemon curd
1 pint fresh strawberries
2 teaspoons cornstarch

Lightly grease a 9 x 12-inch pan(or equivalent) with nonstick cooking spray; set aside. In a large bowl, combine coconut, tapioca and sugar; set aside. Bring milk, 1 cup coconut water, lemon rind and juice to scalding over medium heat, stirring frequently. When just starting to come to a boil, immediately remove from heat and pour over coconut mixture. Blend in the curd completely and pour into prepared pan. Cover(without film wrap touching the pudding)and refrigerate until completely cold and firm.

Meanwhile, hull strawberries, slicing and setting aside 3 of them. Roughly chop remainder and add to a small saucepan with cornstarch. Toss to coat evenly and add remainder of coconut water. Mash with a sturdy fork while bringing to boiling over medium high heat. Once boiling, remove from heat and transfer to a bowl. Cover and refrigerate until needed.

To assemble, cut firm pudding into 12 equal-sized squares. Place 1 square on a serving dish, add a couple tablespoons macerated strawberries and top with another square of pudding. Repeat and serve cold, dusted with additional coconut.

* Or use 10 ounces(Four 2.75-ounce boxes) minute tapioca

Enough for 6 servings


Strawberries and Cream Tapioca


Tapioca is quite confusing. It is marketed in several forms, with each company portraying their product in different manners. To put all this in a nutshell, minute, quick cooking and instant are all the same. This is the type of tapioca I use in this "best of the best" strawberry pudding. There is also pearl tapioca, coming in small and large pearls. These can be substituted in this recipe as well by simply doubling the amount of tapioca and adding 1 additional egg. Cook as directed below, and you will have a treat even the hesitant children will love.
1 1/2 cups whole milk
1 pint fresh strawberries, hulled
2 1/2 tablespoons(25g)minute tapioca minute
1/2 cup sugar
1 egg, beaten
1 teaspoon vanilla


Place the milk in a container that is marked with volume measurements, such as a large measuring cup or blender container. Slice strawberries into the milk to bring it up to 3 cups total volume. Puree until as smooth as possible. Transfer to a medium saucepan with remainder of ingredients, except vanilla. Bring to scalding over medium heat, stirring almost constantly as it heats up. When thickened and hot. remove from heat, stir in vanilla and pour into large bowl. Cover and refrigerate at least 2 hours, or until completely cold.

When ready to serve, remove from refrigerator and stir in as many chopped, fresh strawberries as desired. Spoon into serving bowls and add whipped topping if desired.

Serves 4

Thursday, March 12, 2015

"I am a drinker, with a writing problem."

That was a quote attributed to Brendan Behan, a well-"versed' Irish poet, novelist and playwright, which plays right into this post.


Ireland......The very first thought that comes to mind is green pastures, rolling hills and, of course, a tip of the glass. It wasn't that long ago that the Irish that immigrated to America were "cartooned" as brawling drunkards whose last dime went into the bottle

Now that times have changed, St. Patrick's Day has many declaring their ancestry as Irish, regardless if their name is Baryshnikov, St. Pierre or Polanski. In fact, more than 30 % declare themselves of Irish ancestry in the days leading up to St. Patrick's Day and when the same poll is taken 30 days afterward, only 16 % say they are of Irish stock.

Many seek any reason, really, to indulge in original Irish liquor on just one day of the year. And Ireland is known for the superior spirits that are enjoyable straight from the bottle or mingling with other ingredients to result in a tasty treat, even if you aren't a drinker.


Ireland is much like New England. Not only does liquor bring the worst out in people, but to most of the Irish, it enhances togetherness and warmth, much like rum's effect on our fore-families. Their meals are simple and inexpensive yet provide the comfort feeling we Yankees are known for.

Let me give you just a few examples of this simplicity, but with a New England influence.


Crispy Irish Maslin Bread


Maslin literally means brass, but it also refers to a variety of grains used in the baking of bread. So keeping with tradition, in a way, I am including different grains as well as a surprise ingredient that I think you will find a perfect fit.


If you don't have buttermilk on hand or just don't want to purchase it, the perfect substitute is mixing 1 tablespoon vinegar or lemon juice in the same amount of whole milk and let it sit for 30 minutes, or even longer. It will curdle, which is exactly what you want. The interaction of this with baking soda gives this perfectly salty/sweet bread that distinctive hollow sound and the flavor is will remind you of an old world bake shop, in Ireland of course.


Nonstick cooking spray
2 1/2 cups whole wheat flour, plus extra for kneading
1 cup oat flour*
1/2 cup finely crushed graham crackers
1 tablespoon baking soda
1 1/2 teaspoons salt
3 tablespoons cold butter or margarine
1 1/4 cups buttermilk
1/4 cup honey or maple syrup
1 egg, lightly beaten
Extra honey or maple syrup for brushing the top

Preheat oven to 375-degrees F and position oven rack to the upper portion of the oven Grease a baking pan with nonstick cooking spray. In a large bowl, combine both flours, graham crackers, baking soda and salt. Add butter and cut in using either 2 knives, scissor fashion or a fork. Stir in buttermilk, honey and egg, mixing well. Turn out onto well floured work surface and knead for a minute, or until smooth and elastic. Brush off excess flour and place in the middle of the prepared pan. Brush the top with honey and sprinkle extra rolled oats over the top, slightly pressing into the dough. Mark the top with a serrated knife with two 1-inch deep gashes. Bake 40-45 minutes, or until very well browned all over. Remove to cool slightly before serving.


* Simply place the oats in a blender or food processor and have at it. In a few seconds on high and you will have powdered rolled oats, or oat flour.


Perfect Irish Yankee Soda Bread(Spotted Dog)


Yankee because of the sweet/tangy addition of dried cranberries and Soda because of the soda used........just kidding. This is called soda bread because of the chemical reaction of baking soda with buttermilk. It gives you the perfect rise and density found in old world-style breads while the crispy browned exterior is ideal for breaking open to enjoy.


Nonstick cooking spray
4 cups flour, plus extra for kneading
2 tablespoons sugar
1 tablespoon baking soda
1 1/2 teaspoons salt
4 tablespoons butter or margarine
1 1/2 cups buttermilk
1 egg, beaten well
3/4 cup dried cranberries
2 teaspoons caraway seeds, optional


Preheat oven to 375-degrees F and position oven rack to the upper portion of the oven. Grease a baking pan with nonstick cooking spray. In a large bowl, combine flour, sugar, baking soda and salt. Cut in butter with two knives, scissor fashion or use a fork. Add the buttermilk, egg, cranberries and caraway seeds, mixing well to form a dough. Turn out onto well floured work surface and knead for a minute or so, until smooth and elastic. Form into a round loaf, brush off excess flour. Place in middle of prepared pan and spray the top with nonstick cooking spray. Bake for 40-45 minutes, or until well browned all around. Remove from oven to cool slightly before tearing into.


Bailey's Irish Whiskey Cake

Yes, I already know. There is no such thing as Bailey's Irish Whiskey. This beautifully scented, Irish cake is, however, brought to you by a Bailey and has a hint of Irish Whiskey both in the cake and on 'top'. You can, however, substitute a few drops of rum extract in the milk below or just leave out any hint of alcohol, and its' taste, altogether. The curdled milk is a great way of adding buttermilk flavor without the added expense while giving this upside down cake perfect flavor and moistness.

1/4 cup whole milk, half-and-half or light cream
1/2 cup Irish Apple Whiskey or Irish Apple Liqueur, divided
1 teaspoon lemon juice
3/4 cup(1 1/2 sticks) butter or margarine, divided
1/4 cup brown sugar
1 large, firm apple. peeled, cored and wedged 1/2-inch thick
1/2 cup dried cranberries
1 1/2 cups flour
2 teaspoons baking powder
1/2 teaspoon ground ginger
1 cup brown sugar
2 eggs


In a small bowl, whisk together milk, 1/4 cup whiskey and lemon juice and let sit 30 minutes to curdle while preparing rest of recipe. Melt 4 tablespoons butter in a 9-inch round cake pan over low heat. Using a wooden spoon, stir in the brown sugar and cook, stirring for about 3 minutes until smooth and bubbling. Remove pan from heat.

Lay the apple slices on top of melted butter/brown sugar mixture decoratively. Sprinkle the dried cranberries over the top and evenly drizzle remainder of whiskey; set aside. In a bowl, whisk together flour, baking powder and ground ginger. In another bowl, beat remainder of butter and sugar on high until light and fluffy. Scrape down sides and add eggs; beating very well. Reduce speed to low and beat in the flour, a little at a time. Beat in the milk mixture just until moistened. Spoon batter over apples and even out top without disturbing the apple arrangement. Bake 35-40 minutes, or until toothpick inserted in middle come out clean. Cool cake in the pan for a couple of minutes and then run a knife around the edge of the pan to help release. Invert onto a serving platter or plate quickly and carefully. Serve warm or at room temperature.


Irish Apple Bread Pudding 'Pie'

This bread pudding is anything but typical. It is beautifully sweetened, less dense and 'gummy' than many other equivalent puddings and the sweet, caramelized crust that forms makes you want to just pick it off first then eat the rest later. Use whatever muffin you desire, I just happened to adore cinnamon but regardless of what you choose, make sure you have 5 cups total after cutting. Taitneamh a bhaint as!


4 large plain or cinnamon muffins
4 teaspoons butter or margarine
3 large apples, peeled, cored and diced, divided
1 cup apple juice or water
1/4 cup maple syrup
Nonstick cooking spray
3/4 cup milk
3 eggs, beaten
1/3 cup brown sugar
1 teaspoon cinnamon
1 teaspoon vanilla or almond extract
Juice and grated rind of 1 lemon
1/2 teaspoon dried ginger
Irish Butterscotch Cream, recipe below


Slice muffins horizontally about 1-inch thick. Butter all cut sides and grill over medium heat until well browned, about 2 minutes per side. Place on a plate and let cool in refrigerator for an hour, preferably overnight. Meanwhile, add 2/3 of the diced apple to a saucepan along with apple juice or water and maple syrup. Bring to a boil over medium heat, stir, reduce to low and simmer 6-8 minutes, or until it has thickened and apples are done, but still firm. Remove from heat and set aside. Spray a 9-10-inch cake pan with nonstick cooking spray liberally; set aside. Preheat oven to 350-degrees F.

Cut grilled muffins into cubes and add to a bowl along with remainder of diced apple. In another bowl, whisk together milk, eggs, brown sugar, cinnamon, vanilla, juice and grated rind and ginger. Pour over muffin cubes and gently toss to evenly coat. Transfer to prepared cake pan, evening out the top. Spoon cooked apple mixture over the top evenly and bake 40-45 minutes, or until it is firm when touched in the center with a spoon or fork. Make Irish Butterscotch Cream while pudding is baking. Remove pudding to cool slightly before running a dull knife around the edge to loosen. Cut into wedges and serve drizzled with Irish Butterscotch Cream.

Irish Butterscotch Cream

Put 1 cup whole milk, light or half-and-half cream in a saucepan with 2 tablespoons butter or margarine, 2 tablespoons each of brown sugar and Bailey's Irish Cream and 2 teaspoons honey or corn syrup. Over low heat, bring to a simmer while stirring frequently to prevent scorching. After 2-3 minutes, it will be thicker and creamier, stir in 1 teaspoon vanilla and remove from heat.


                                       Traditional Pan Haggerty

Simple? Yes! Traditional? Yes! But don't let this seemingly mundane dish prevent you from make it. There are so many things I could do to this dish to keep those "food snobs" at bay, but why play with a recipe that has been enjoyed for so long in Ireland? Us Yankees have been enjoying this dish for just as long, but called Scootin' 'Long the Shore. And as much as I would like to add this and that to our version, I decided to take the critics blows for offering a "dull and idiot simple" New England classic. My response to them? You really don't want to know!

3 slices bacon, diced
1 small onion, peeled and diced
3 large potatoes, about a pound, diced
2 cups chicken or vegetable broth
1 cup shredded Cheddar cheese
Salt and black pepper to taste
Sour cream, if desired


Heat a large oven-safe skillet over medium heat. Add and cook bacon until crisp or to your liking. Remove bacon to crumble and add back into the skillet with onion and cook an additional 5-6 minutes, or until onion is soft but not browned. Drain fat and add potatoes and broth. Stir to combine, bring to a boil and cover. Reduce heat to low and simmer 8-10 minutes(according to the size of your potato cubes), or until the potatoes are firm, but tender and the liquid has absorbed. If you still have liquid after potatoes are done, simple increase heat to medium and continue cooking, uncovered, for a few more minutes until it has evaporated and/or absorbed. Preheat broiler and place oven rack at least 3-inches from heat source. Remove skillet from burner, evenly sprinkle cheese over the top and broil until as crisp as you like. Remove to serve immediately. Top with sour cream if desired.


Tipperary Apple Pudding


I remember once, many years ago, trying a Tipperary Pippin Apple and was blown away at the perfect cooking nature of it. Of course, now there are so many more to choose from but that one taste has stayed with me all these years. So in honor of my first bite of a true Irish apple, enjoy this Yankee take on the Apple Barley Pudding that is so dear to Irish hearts, and palates. I gave this a little zing that I think is spot on. For an even warmer feel, try substituting allspice for the nutmeg.

Now many of you will be asking by now, why barley in a dessert? Many centuries ago, in Ireland, barley was a cereal grain that was widely used in kitchens during St. Patrick's time, which is only summized as being in the 5th century. So barley was used as a thickener, porridge, breads, pastries and, of course through natural progression, desserts of all kinds.

5 large apples of your choice, peeled, cored and roughly chopped
5 tablespoons pearl barley
2 cups water
2 cups apple juice
3 tablespoons lemon juice
1/3 cup sugar
1/2 teaspoon each of cinnamon and nutmeg
1 cup whipped cream or topping
1/4 cup dried cranberries
3/4 cup cranberry juice or orange juice


In a large saucepan, bring the apples, barley, water and apple juice to a boil over medium-high heat. Reduce heat to medium-low, cover and simmer for 20-25 minutes, or until barley is soft. Remove from heat and strain, reserving any liquid. Add to a food processor bowl, or in batches using a blender and puree until it resembles chunky applesauce.  Add liquid if needed to puree or more apple juice if the liquid has been fully absorbed. Transfer mixture to a large bowl and add sugar and spices, mixing well. Cover and refrigerate until cooled or serve warm.

Meanwhile, make cranberry "sauce". In a small saucepan, add cranberries and juice. Bring to a boil over medium,-high heat. When boiling, reduce heat to low and simmer 10 minutes, or until cranberries have started to take in the juice and swell. Transfer to a blender or food processor and puree until smooth. This sauce will thicken perfectly while pureeing because of the very high, natural pectin levels in the cranberries. Pour into a bowl and refrigerate until cooled.

To serve, spoon apple pudding into 3-4 serving dishes, top with whipped topping and drizzle sauce over the top.

Pearl barley has been processed, therefore it is not classified as a whole grain. But if you would like to add hulled barley(aka pot barley or barley groats) in order to obtain the fiber, simply cook twice as long, and you will need to add one extra cup of liquid because of the longer cooking time. The consistency will not be altered because of the addition of other ingredients, but if you were to cook it on its' own, it will be much chewier and sticky. And don't forget to rinse it before cooking to help keep that stickiness down.

Sunday, November 30, 2014

Christmas Decadence

Through the years, the first and second Yankee Chefs have created some tasty and world-class desserts. And world-class, I mean so sinfully flavorful, you would have thought dozens of ingredients were used and hours of preparation. This has never been, nor ever shall be, the case with the third Yankee Chef, me! I have proudly created some dishes that would simply rival any dessert or pastry found in upscale restaurants and bakeries and I am equally proud to say that the preparation, ingredients and cost of many dip far below what you would expect.


Such is the case with the following two recipes. Both of these indulgences are absolutely explosive in flavor and ring in the Holiday season perfectly.

If you want these to adorn your Christmas tables this year, simply place them in the oven about 40 minutes before you think your guests and family will be ready to dig in.


Self-Glazing Chestnut Cake

This cake is the epitome of what should be served at Christmas. Sweet and the most moist cake you will have this year, with the taste of roasted chestnuts evident in every bite. You know the second you take it from the oven and notice the dark brown caramelization on all sides of the pan that you have something that everyone will remember.

What is nice about this cake is that you can substitute any peanut in place of the chestnuts and replace the apple jelly with a jelly of your choice as well.

For those of you who are on a gluten-free diet, replace the flour with corn, buckwheat or quinoa flours because the jelly will keep the cake moist, regardless of what type of flour you use.

It truly doesn't matter how you play with this recipe, as long as you eat it!(Sound like a parent don't I?)


1 3/4 cups apple jelly
2 teaspoons vanilla
2 teaspoons lemon juice
1/2 teaspoon ground cloves
Nonstick cooking spray
3/4 cup brown sugar
2 teaspoons cornstarch
1/2 teaspoon cinnamon
1 1/4 cups flour
3/4 cup granulated sugar
2 teaspoons baking powder
1 teaspoon nutmeg
3/4 cup milk
3/4 cup chopped, cooked(roasted) chestnuts *
2 tablespoons melted butter or margarine


Add apple jelly, vanilla, lemon juice and cloves to a small microwavable bowl, cover loosely and heat for 45 seconds. Remove to stir. If the jelly hasn't melted completely, continue heating another 15 seconds; set aside.

Preheat oven to 350-degrees F. Spray an 8 x8-inch pan with nonstick cooking spray; set aside. In a small bowl, mix together brown sugar, cornstarch and cinnamon until well combined; set aside. In another bowl, blend flour, granulated sugar, baking powder and nutmeg. Add the milk, chestnuts and melted butter, stirring just enough to combine. Pour into prepared pan. Sprinkle brown sugar mixture over the top. Pour melted apple jelly evenly over the top but do not stir in. Bake 30 minutes, or until the top springs back when touched. The jelly will have pooled in the center of the cake, so test the cake along the side.

Remove from oven, let cool for a few minutes and scoop out cake to serve as is or with ice cream or whipped topping if desired.


* These are easily found in any supermarket during the Holidays.


Saucy Pumpkin-Cranberry Holiday Cake

This cake should be served right along side of the above so that everyone can choose. But there is one downfall if you are going to do that. One bite of either and people are going to choose BOTH! Unlike the above recipe, the 'sauce' in this recipe gravitates to the edge of the cake, seeping down to the bottom as it bakes, so even though you may not notice it, the bottom is flooded with creamy, sweet goodness. So go ahead and scoop your portion out as opposed to cutting into it, like other cakes. You will also notice, upon eating, that I should have used the word 'moist' when titling this recipe.


1 3/4 cups cranberry juice
2 teaspoons lemon juice
Nonstick cooking spray
3/4 cup brown sugar
2 teaspoons cornstarch
1 teaspoon each cinnamon and nutmeg
1 1/4 cups flour
3/4 cup granulated sugar
2 teaspoons baking powder
1/2 teaspoon dried ginger
3/4 cup milk
3/4 cup canned pumpkin
2 tablespoons melted butter or margarine


Add cranberry juice and lemon juice to a small bowl and whisk well; set aside. Preheat oven to 350-degrees F. Spray an 8 x8-inch pan with nonstick cooking spray; set aside. In a small bowl, mix together brown sugar, cornstarch, cinnamon and nutmeg until well combined; set aside. In another bowl, blend flour, granulated sugar, baking powder and ginger. Add the milk, pumpkin and melted butter, stirring just enough to combine. Pour into prepared pan. Sprinkle brown sugar mixture over the top. Pour cranberry juice mixture over the top but do not stir in. Bake 30 minutes, or until the top springs back when touched.

Remove from oven, let cool for a few minutes and scoop out cake to serve as is or with ice cream or whipped topping if desired.

 
Try other juices here folks, as well as other spices and flavorings in the cake as well. Coconut in the cake and pineapple juice as the sauce is a great idea, as is chopped or candied cherries in the cake and cherry juice on top. Try orange marmalade in the cake and orange juice on top. See what I mean?

Wednesday, August 20, 2014

Sufferin' Succotash

Ever give it much thought when Sylvester blurted out that phrase whenever he didn't get his way?

There has been so much written about Succotash and, as in genealogy, there is a lot of half truths. While many "authorities" say that Succotash comes from the Algonquin misckquatash, I don't believe that to be the case. See my article on corn at theyankeechef.com.

In the meantime, Succotash is a great, original American Indian dish that our fore-families have enjoyed for centuries. This dish is made mostly during the Holiday times of year, which is not understood by me. It was eaten at all times of the year, whether it was when the corn was ripe to eat or in the middle of winter when they had to use their dried corn and beans.

Although fava and lima beans were the original beans used for this dish, I have substituted Great Northern, only because my kids won't touch either one of the other two. Clabbard, or Clapboard, beans were used during the 18th and 19th centuries more often than not as well.

I have also used a variety of vegetables in this Yankee staple too, but have omitted any protein, although the Indians and colonists used whatever meat or fish they had on hand. Succotash is great by itself as a side dish or as a base for meat or fish. It is as tasty as it is colorful.

Enjoy these three recipes that highlight our heritage and simplicity as well as being the original colony of comfort foods, the New England colony.


Creamy New England Succotash

Without going into a long spiel about the beginnings of Succotash and variations over the years, I will simply tell you this is probably as good of a true Yankee dish as you are going to enjoy. True Succotash used chicken, pork or whatever protein the family had and cooked it with beans, corn and onion. They would then add some milk to the pot and let it get a little thick before serving it to their family. I have added some more vegetables but have kept the true recipe intact. I think you will enjoy this trip back in time, with a modern approach.

3 strips bacon, diced
1 small summer squash, diced*
1 small zucchini, diced
1/2 cup red bell pepper, minced
1/4 cup minced onion
2 cups milk
1/2 cup sour cream
1 1/2 cups whole kernel corn
1 cup cooked navy beans
Salt and pepper to taste

In a large skillet or pot, cook bacon over medium heat until crispy. Leaving the bacon and fat in the pan, add the squash, zucchini, bell pepper and onion. Stirring occasionally, cook until vegetables are crisp tender. In a bowl, whisk together the milk and sour cream until well incorporated; set aside.

Add the corn, beans and milk mixture and salt and pepper to taste. continue cooking, stirring occasionally still, until everything is heated through and most of the liquid has been absorbed, another 5-7 minutes.

*or use zucchini or a combination of each


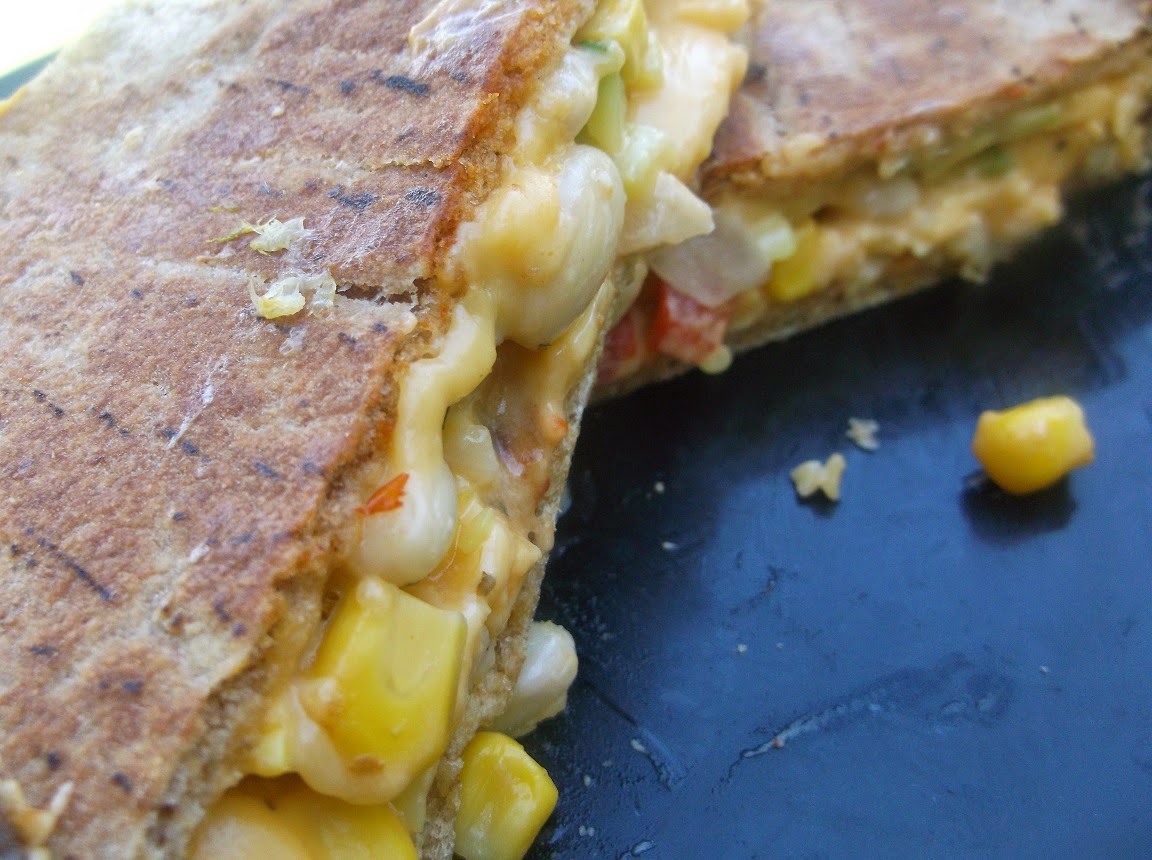
Cheesy Succotash Grill

Want a great and filling grilled cheese sandwich that is truly filling? Here it is, and using Succotash ingredients gives you the satisfaction of protein without the fat. As you know, Succotash has been around for centuries here in New England and many moons before us Europeans coming over. This is, yet again, one of the true, great food gifts bestowed upon us from the Native Americans.

2 small pita breads

Pumpkin Mayonnaise, recipe below
Nonstick cooking spray
1 cup shredded Pepperjack cheese
1 cup whole kernel corn
1/2 small diced tomato
1/4 cup diced onion
1/2 cup cooked great northern beans*
1/2 cup diced, cooked chicken


With a sharp knife, insert it into the pita bread and cut around it to form two thin halves. Repeat with other pita. In a small bowl, mix 1/4 cup mayonnaise with 2 tablespoons pumpkin, 1/2 teaspoon chili powder, 1/4 teaspoon cumin, 1/4 teaspoon salt and black pepper; mix well; set aside. Spray the outer outer half of two pitas and place in a large skillet over medium-low heat. Spread some Pumpkin Mayonnaise and top with equal amounts of half the cheese, corn, tomato, onion, beans and chicken. Sprinkle remainder of the cheese over both and top with the other halves of the pita, with more Pumpkin Mayonnaise spread over each. Cook, flattening down with a spatula, until it is starting to crisp. Carefully flip over to finish crisping on the other side. Remove and enjoy.


*Lima, fava, kidney or cooked pinto beans would be equally delicious


Tempting Jagasse

Not many people know, or even heard, of Jagasse. In the early 1800s, fishermen along the Massachusetts coast were also farmers in their 'non-fishing' time. Of course their families had their fill of fish in meals and this dish gave them a subtle hint of the ocean while enjoying the bounty of the garden as well. They used whole fish in their Jagasse, but just the hint of the ocean is all that is needed in this delicious, original Yankee recipe derived from Succotash.

2 strips bacon, diced
1 cup fish broth or clam juice
1/2 small summer squash, diced*
1/2 small zucchini, diced
1 cup whole kernel corn
1/2 cup red bell pepper, minced
1/4 cup minced onion
1 cup cooked navy beans
2 cups cooked rice
1(15-ounce) can tomato sauce
1 teaspoon garlic powder
1 teaspoon onion powder
1/2 teaspoon red pepper flakes
Salt and black pepper to taste


In a large pot, add the bacon and cook until crispy over medium heat. With the bacon and fat still in pot, add the fish broth. Boil for 3 minutes before adding the squash, zucchini, corn, red bell pepper and onion. Stirring occasionally, cook until the vegetables are just barely tender. Add beans, rice, tomato sauce, garlic and onion powders, red pepper and salt and pepper to taste. Stir to combine and continue cooking until everything is heated through.


Enough for 4 side dishes


Saturday, May 3, 2014

My Favorite(and simplest)Octopus Dish


I must credit a certain Gayle Bailey(Yup, another gorgeous member of my family) as the inspiration behind this recipe. My children NEVER knew they were eating octopus until after they finished. While sitting down at my home, her and I started talking and talking and never finished a complete thought because we had so much to gab about. I could literally sit down with her and just plain listen to her culinary stories from various countries she has frequented, as well as her deep-rooted, Southern upbringing that is so obvious when talking with her. In one particularly interesting topic, Gayle related to me that she had visited Italy in the past and had enjoyed an addition in her tomato sauce while there. She loved it and now only makes her tomato sauces using this addition. that .  Grated lemon rind! I had to experiment and on the first try I was taken aback. Not only was the sauce perfectly balanced in flavor with the addition of lemon, but to combine this sauce with the great taste of seafood and the kick of a little chile oil, it was spot on. Thank you Gayle, life is much tastier because of your brains AND beauty.

This recipe is aptly named for the lady who inspired me to rush to the store. If you translate the title of this aromatic dish, you will see to whom it is named. It may take a little "out-of-the-box" thinking, but I think you will get it. In the meantime, octopus is found fresh and it is not that expensive. If you happen to purchase frozen octopus or squid "leg meat", simply thaw before continue with recipe.


Polpo Ventoso


12 ounces linguine

2 tablespoons chile oil

1/2 pound sliced octopus*

2 cups tomato sauce

1 cup ricotta cheese

1 teaspoon grated lemon zest


1 teaspoon sugar

1 teaspoon oregano

1/2 teaspon chopped basil

Salt and black pepper to taste

1 sweet bell pepper, seeded and diced


Cook pasta according to package directions; set aside in strainer. Over medium heat, add the chile oil to a large skillet until hot. Add the prepared octopus and cook for 4-5 mintues, or until just cooked through. Meanwhile, in a small bowl, whisk together the tomato sauce, ricotta cheese, grated lemon zest, sugar, oregano and basil. Season to taste with salt and pepper. When the octopus is done, add the bell pepper and continue cooking and additional 2 minutes, stirring frequently. Add tomato suace mixture, stir to combine and reduce heat to low. Cover and simmer 10 minutes.

Remove lid, add the pasta and toss(or stir) to coat well. Be careful, since the pasta is now very dry and lumped together somewhat, you will need caution when separating strands while tossing with the sauce. Divide evenly among plates and serve hot. Enough for 4-6 servings.

If you don't have any chile oil on hand and you really want this dish, simply add 1 cup olive oil to a small suacepan with 2 teaspoons red pepper flakes. Turn heat to low and let oil and pepper flakes gently warm together for 5 mintues. Remvoe from heat, cool to room temperature and transfer to a container with a lid. This will keep very well in the refrigerator for a month.

*You can buy fresh baby octopus at your local supermarket or use frozen, already sliced octopus (or squid) tentacles. I removed the "suckers' only for my children but feel free to leave on.


Wednesday, September 18, 2013

Taking a Breather


   I have been so busy with my second book, judging, appearances and book signings, I have been neglecting one of my only solace-rendering past-times.....reading. So I grabbed some very old manuscripts, recipes, stories and notes that my father had written before he died and I started reading them. Then I began to think that I should add some old time dishes that our grandparents, great grandparents and ancestors used to subside on and put them online so that they will never be forgotten.
   Some of us calm our nerves and relax by watching television while others take a walk or simply sit and think. I(like my father) love to "remember when...". Even though I don't personally remember these dishes, I have made them time and time again(I truly was meant to have been born many generations ago)
    I do love to think of how my parentage were huddled in their crude cabins in the middle of Bailey Hill with only the fire from the hearth casting its illumination. I love pondering how meals must have been so comforting and satisfyingly odoriferous. Granted we would snub our noses at homemade, real butter now and using leaf or hogs lard is a serious 'no-no' now, but the flavors and aromas of real food surely calmed the rowdy children and soothed the savage husband.
   Let me give you a few old-time dishes you may or may not have heard of. Food that was the energy giver for those hard working folks. People who didn't need to exercise to stay fit, but whose exercise was their daily chores and necessities of living.

Ambrosia, ca 17th century-mid-19th century. When we think of the word ambrosia today, some type of fruit salad mixed with a dairy product and topped with coconut comes to mind. Back a few generations, ambrosia(literally meaning food of the Gods) was simply corn. Generally it was the dried and milled corn that was deemed such.
   Hasty Pudding was made with dried corn(henceforth referred to as cornmeal). And although many of us have heard of Hasty or Indian Pudding, not so many knew that it was an absolute sin for it to be the least bit lumpy. My father used to say that it was originally made with milk and eggs and a "trifle of Muscovado sugar or Portorique molasses". Brown sugar sauce was generally made to top it off, which was just melted brown sugar.
   Back in the day, Indian pudding wasn't the insipid recipe many chefs use today, but nicely stirred, well-boiled without any two particles sticking together. People, also, don't know to to classically enjoy this dish as well. A spoon should be dipped into milk before it lifts the pudding to the mouth. This keeps it from sticking not only to the spoon, but to the inside of your mouth. It was meant to be enjoyed one spoonful at a time, each bite completely separated from the next.
   And do you think the Italians were the first to enjoy polenta? No, no, no, no! Eating hot Indian or Hasty Pudding was just as often seen in our homesteads of old as was cutting it when cold and grilling it in lard the next day. It is often written that when fried in fresh butter of cows who only ate clover, this meal was fit for a king.

Milk Porridge, ca 17th century-late 19th century. First water was boiled. Cornmeal was then added through ones fingers(acting as a type of coarse strainer) and the other hand was gripping a wooden paddle, stirring as the cornmeal was added to the water. When the corn was added, and the lot stirred for a time, fresh milk directly from the cow was very slowly added. It is said that you should not add the milk until you could see your nose reflecting off the surface of the cornmeal/water mixture.

Corn Biscuit, ca 18th century-late 19th century. This was an Indian luxury, and was made with one pound of butter, one pound of sugar, ten eggs and a pint of new milk, with just enough cornmeal to mold it into thin cakes. Sound familiar? It is now known as Pound Cake!

Whitpot, ?-mid-18th century. A very thin Indian Pudding, baked in a very slow oven(low temp) so that the milk, eggs and molasses formed a jelly throughout the entire pudding.

Herring Sticks, ?-late 19th century. From mid-May to mid-June, the herring run was on in all of New England in days gone by. Many old texts referred to Cape Cod herring as an alewife. Often called a "poor mans fish", it was freely gifted each year by the town to each child born within the township limits. Many townships actually enacted legislation ordering just such a gift!
  The herring was so plentiful that townships were not able to eat or locally sell them, so they were shipped to larger cities. One older lady, in her journal from New Hampshire, relates "I do relish a nice fresh herring with my breakfast".
   Salting and smoking was the norm to help keep a family fed through the lean months. Before salting or smoking, however, they were strung on sticks. The sticks were for the most part whittled from cedar, stripped from the old cedar, split rail fences everyone had around their property. The cedar sticks were passed through the gills of the fish with a dozen or so strung on each. On many New England roads, the lettered signs on the fences used to read, "Herring  10 cents a stick".

Lobster Stew. Now of course many, if not all, of us have heard of Lobster Stew, but would you like to know how to truly make it the old-fashioned way? The correct way? A little trivia first. Lobster Stew was almost always accompanied with a couple of sour pickles.
   Begin with the tomalley. Saute it in an equal amount of butter in a thick cast iron skillet for 5  minutes. Add the cooked and picked lobster meat and every bit of juice that came from the cooked lobster as you were shelling it. The ratio between lobster meat and juice should be about 50-50. You don't ever, EVER, add salt or pepper to lobster stew! Old cooks and housewives used to relate that lobsters got plenty of salt and seasoning from the ocean it lived in. I tend to agree!!
   Leave this stew on a hot fire for 5 minutes, then push it back to a cooler part of the stove to come down from boiling to a bare simmer for about 15 minutes. While still barely simmering, slowly(and they did mean SLOWLY) add your milk. Housewives say to "trickle" the milk into the stew, while constantly stirring. Add  rich cream after the milk has been added. When the stew blossoms out suddenly into a rich salmon pink under your spoon, you can know that the stew has been made properly and is now to remove from all heat sources and let cool for a hours . My father used to say that cooling the stew was just as important as making it. The flavor increases drastically. True lobster stew wasn't meant to be consumed when it is made, but rather cooled for many hours then reheated to enjoy.  As if.....

Muslin Toast, 18th century-mid-19th century. This was a favorite supper dish of many Yankee families. Now remember that dinner(or the noontime meal) was the heartiest of all repasts during the day, while supper was just enough food to hold you over until the table was laden for breakfast. Muslin Toast was a type of rye shortcake, the size of the skillet, that was grilled in sweet homemade butter on each side until very crispy. As each side was crispy, it was cut off and set aside. This was repeated until you had about 7-8 thinly crisped slivers of shortcake, with the last slice being grilled. All these crispy slices were then placed in a bowl of hot, thickened and salted milk.


My how times and appetites have changed. I loved looking back and I think I will continue this post within the next few days.

Monday, August 19, 2013

FYI on Lobsters, Maine Lobster!


Although nobody can determine exactly how many live lobsters it takes to make a pound of meat because you need to take molting into consideration, it can roughly determined.. Generally speaking, during the winter time, when lobsters are at their fullest of flesh, it takes about 4 1/2 pounds of live lobsters to get a pound of meat. In the late summer, when lobsters have shed(molted), it takes about nine 1-pound live lobsters to get a pound.

There are approximately two cups of lobster meat in one pound.

To hold a lobster correctly without feeling the "pinch", simply hold it at the end of the carapace where it joins the tail.

To pack lobsters for traveling, put them in a Styrofoam or insulated outer box packed with ice. To prevent lobsters from coming into contact with the fresh water, ice should be enclosed in plastic bags. Cover lobsters with seaweed whenever possible, this will insure them to be alive at least a day of traveling.

You can keep live lobsters for about 15 hours under refrigerated conditions, although most will survive for at least 24 hours. Keep them damp with a wet cloth or a layer of seaweed. Do not store live lobsters in fresh water or enclosed in plastic bags.

In Maine, lobsters are less expensive from the end of August to the beginning of November because this is when most lobsters are harvested.

The difference between a hard-shell and soft-shell lobster is when the lobster outgrows its shell. It molts and discards(or sheds) the old shell. It then has a soft shell and is called a "shedder" or soft shell. As the lobster feeds, its shell hardens, and it adds meat to its body. Soft-shell lobsters have less meat than hard-shell lobsters, but their shells also weight less. Since you buy lobsters according to their weight, they are about the same in terms of price. It should be noted, however, that hard-shell lobsters usually survive longer in the refrigerator than one that have soft shells.

  It is okay to eat a soft-shell lobster and some people prefer them because, as they say, the meat is a little sweeter and they don't need any tools to crack them apart.

  A lobster molts about twenty-five times in the first 5-7 years of their lives. After that, they molt less often, about once a year. After a molt, it takes months for a shell to harden and fill in again with meat.

Lobsters increase  in weight about 20 percent after they shed.

  How much water to boil a lobster? Put one to two inches of water in the bottom of a pot to steam lobsters, or allow 2 1/2 quarts of water per lobster if you want to boil them. You don't have to use salt water, but some chefs believe lobsters taste better if you add salt to the water or use seawater, which contains about 3 percent salt.

A lobster is done when you are able to pull out an antennae easily.

  A live lobster is generally a greenish-brown color when alive because of many different color pigments called chromatophores. When it is cooked, these pigments are masked except for astaxanthin, which is the background red pigment.

  The tomalley functions like a combination intestine, lover and pancreas in the lobster. Some people(this chef included) think this is the best part of the lobster.

  The black vein in the tail is generally removed before eating. It won't hurt you, it is simply the intestine where part of the digestive system is. The taste is slightly unpleasant but not readily tasted.

  The red part you sometimes see inside a lobster is the roe or unfertilized eggs which have not been extruded. It is called "coral" and many people find this very tasty.

There are NO parts of the lobster that is poisonous.

A lobster drops a claw as a defense mechanism, but grows another over a couple of years.

Here are some common terms(both new and old-school) to describe the size of lobsters.

1-pound: chickens
1-pound to 1 1/8-pound: heavy chickens
1 1/4-pound: quarters
1 1/2 to 1 3/4-pound: selects
2-pound: deuces or 2-pounders
2- to 2 1/4-pound: heavy selects
2 1/4- 2 1/2-pound: small jumbos
Over 2 1/2-pound to ab out 4-pound: jumbos

Large lobsters have the same textured meat as smaller. However, cooking a lobster for too long can make it tough, so make sure you only cook lobster until the meat is done, regardless of the size.

Maine lobster is NOT found only in Maine! Homarus Americanus is found on the east coast from Newfoundland to North Carolina.

A crayfish is NOT a baby lobster. It is related but they live n fresh or brackish water whereas lobsters live only in saltwater.


  You can microwave a whole lobster quite easily. Simply plunge the tip of a knife between its head and first segment while on its belly. The lobster may show signs of movement for a few minutes.
  You can, if desired, take a skewer and run it the length of its tail to prevent curling. Arrange lobster in a casserole dish or other high sided microwave-safe dish, add 1/2 cup hot water and cover tightly with film wrap, poking a few holes with a fork throughout the top in order to vent some of the steam. Microwave on high, turning over after 6 minutes for a total time of between 10-12 minutes, or until the antennae pulls out easily.

  To cook lobster tails on your grill, run a pair of kitchen scissors along the underside of the tail, removing this softer shell. Insert a skewer between the remainder of the upper shell and the meat, to prevent furling while cooking. Place tails with the shell side down on grill grates set in the high position. Grill for 5 minutes over medium heat. Turn tails during cooking, grilling the other side for 6-7 mintues. Return tails to shell side down position and baste meat with melted butter mixed with lemon juice if desired, but watch out for grill flame-ups.

  Lobsters DO have teeth, but they are in its stomach. The stomach is located a very short distance from the mouth, and the food is actually chewed in the stomach between three grinding surfaces that look like molar teeth called the "gastric mill".

  Many, MANY, people have asked me "How do you tell a male from a female lobster?" You simply turn the lobster on its back and look at the first pair of swimmerets. If it's a male, the swimmerets are hard and bone-like; they are soft and feather-like in the female.


Ol' Barney Beal
  One can't talk about lobsters without mentioning a certain Barney Beal. he is larger than life now and apparently was when he was alive as well. many folklore's and legends are just that, but with Barney, it is true.He existed, lived on and around Beal's Island, Maine and was as tough as they came(next to Ol' Gus Bailey that is).
  His feats of strength are stuff of legend but the stories are indeed true, although some may have compounded on that legend.  Here are a couple to enjoy.


  It seems that Barney Beal was on one of his trips along the coast in his freighter. He stopped at Rockland and, while standing on the dock, he became involved in an argument about any man, there, that could lift a 1200-pound anchor which lay on the dock. Several tried it but no one could move it. Then someone turned to Barney and asked him to try. he declined until a man standing nearby said that he would be him five dollars that he couldn't lift it. Well, Barney couldn't let a challenge like that go by, so he accepted. He walked over, bent down, and lifted the anchor clear of the dock.
  When it came to paying off the bet, the fellow backed out. Barney said, "That's all right." he reached down, raised the anchor again, walked it to  the edge of the wharf, and dropped it--right through the bottom of the boat belonging to the man who had refused to pay off the bet!
As told by Olive Coffin, Steuben(1963)
Northeast Archives #62031


  Well, tall Barney Beal weighed about 325 pounds and was just about six feet seven inches tall. He would sit down in a common kitchen chair and drum is knuckles on the floor.
One time he came to Bill Cummings' store here in West Jonesport, and Porter told him he could have what flour he could carry out of the store in barrels. So Barney picked up one barrel and put it on the counter, got another barrel under his arm, and then got the one on the counter under the other arm and took them out the door and down to his rowboat.

Wendell Beal, West Jonesport(1963)
Northeast Archives #15251


                                                              Barney Beal's Home


Barney Beal's Last Great Feat
  Barney Beal was known far and wide for his strength, and it was his strength that killed him. He often would hook his fingers in the front of a dory and pull it up the beach. He was living on Pond Island, in Milbridge Bay, at the time of his death, and this is what caused it.
  He had some in from tending his traps. He got out at the low-water mark, putting the painter of the boat over his shoulder, and started up the beach. As he dragged the dory over the seawall, he broke a blood vessel in his heart and died instantly.

Charles Beal, Milbridge(1963)
Northeast Archives #62030


  As proof of his life and  death, The Yankee Chef has seen Barney's death certificate, The death certificate for Barney Beal indicates he died at 63 on February 1, 1899 of a heart problem

  Tall Barney’s home near Barney’s Cove, Beals Island, Maine. Tall Barney built the house himself in 1873 with the help of his son John, 15 years old at the time. According to Avery Kelley, a great-great grandson of Barney, it was built with lumber that came off a vessel that went ashore.